GTO Click System - Installation Video
GTO Universal System - Installation Video
Click Beam System - Installation Video
Troubleshooting Guides
From perfecting corners to seamlessly integrating LEDs, we’ve tackled the toughest challenges—and have the quick fixes to keep your project running smoothly!
How to Install L.E.D on GTO’s Universal System
How to Install L.E.D on GTO’s Universal System
Step 1: Place a template channel at the desired spot in between the profiles.
Step 2: Slide the next profile against the channel and secure it.
Step 3: Remove the template channel to make space for the LED installation.
Step 4: Trim a small opening in the back of the channel for LED wiring and slide the wires through.
Step 5: Install the LED strip along the channel and secure it in place.
Step 6: Finish by attaching the cover and placing the end cap.
Watch the video to see the full demonstration and learn how to enhance your installations with seamless LED integration using the Universal System.
How to Create a Ridged Look with Universal 140
How to Create a Ridged Look with Universal 140
1. Use the U10 Profile as a Guide: To create a ridged look, position a “U10 Profile” at your desired location and use it as a template.
2. Template Placement: Ensure the “U10 Profile” is properly aligned and positioned before proceeding with the rest of the installation.
Watch the video for detailed instructions and expert tips on achieving a perfect ridged look with the Universal 140 profile.
How to Finish a Corner with CLICK Vertical System
How to Finish a Corner with CLICK Vertical System
1. Cut the Rail: Follow the marked line between the teeth and cut the rail accordingly.
2. Drill Holes for Securing: Drill 2 holes above and below the cutting point, then secure the rail by drilling flat head screws through the back.
3. Click in Profiles: Begin clicking on the profiles to complete the first wall.
4. Install the Return Wall: Attach the rails on top of the installed angle, secure them with screws, and click on the profiles until the return wall is complete.
Watch the video for detailed instructions and helpful tips for using the CLICK Vertical System to finish corners flawlessly.
How to Install a Vertical Corner with Universal Profile
How to Install a Vertical Corner with Universal Profile
1. Cut the Profile Tongue: Use a table saw to cut the tongue of the profile, ensuring you do not cut the groove.
2. Level and Secure the Angle: Align the angle with the edge of the corner and secure it to the wall surface for stability.
3. Install the First Profile: Insert the first profile with the shaved tongue and continue with the installation for the entire wall.
Watch the video for more details on how to achieve a flawless vertical corner installation using the Universal Profile.
How to Install a Frame with Mitered Angles Using the Universal System
How to Install a Frame with Mitered Angles Using the Universal System
1: Trim all four angles at a 45-degree angle on both sides to prepare for the installation.
2: Create a frame and secure it with screws to ensure stability.
3: Begin filling in the frame with Universal Profiles, securing each one with screws for a tight and durable fit.
Watch the full video to learn more about each step and achieve seamless results for your frame installation projects.
When and How to Install Furring Strips
When and How to Install Furring Strips
1: Mark and cut the furring strip to your desired size.
2: Always begin with the end of the wall or ceiling. Ensure a maximum 3’ span between each furring strip.
3: Use flat head self-drilling screws to secure the furring strips to wall studs or joists.
By following these simple steps, you’ll ensure a professional and effective installation of furring strips for your project.
How to shave the Tongue on the Universal Profile
How to shave the Tongue on the Universal Profile
1. Cut the Profile Tongue: Use a table saw to carefully cut the profile’s tongue for a smooth fit.
2. Level and Secure: Align the edge of the corner and secure it to the wall surface for a stable installation.
Watch the video for details on how to shave the tongue on the Universal Profile.
How to Install an Exposed Corner with CLICK Profile (Vertical)
How to Install an Exposed Corner with CLICK Profile (Vertical)
1. Cut the Rail: Cut the rail along the marked line between the teeth for a precise fit.
2. Drill and Secure: Drill 2 holes above and below the cutting point and secure the rail with flat head screws.
3. Align the Angle: Align the angle with the edge of the wall and fasten it securely with screws.
4. Attach the Rail: Attach the rail on top of the installed angle to ensure stability.
5. Click in Profiles: Continue clicking in the profiles until the installation is complete.
Watch the video for detailed instructions and helpful tips on achieving a perfect vertical corner with the CLICK Profile.
How to Finish an Exposed Corner with Horizontal Universal Profile
How to Finish an Exposed Corner with Horizontal Universal Profile
1. Align the Angle: Position the angle with the edge of the wall and secure it with screws.
2. Secure the Profile: Attach the profile to the pre-installed furring strip for a sturdy fit.
3. Slide and Fasten Profiles: Slide the next profile into place and fasten it with screws.
4. Repeat for Completion: Continue these steps until the entire installation is complete.
Watch the video for a full demonstration and tips for using the Horizontal Universal Profile to finish exposed corners efficiently.
How to Install Using CLICK System on Fencing Posts (Horizontal)
How to Install Using CLICK System on Fencing Posts (Horizontal)
1.Alignment Check: Before attaching the second rail, ensure the teeth are aligned on both ends. Click on the first profile and use a level to confirm proper alignment.
2. Profile Installation: Click on the first profile and continue with the installation
3. Repeat for Completion: Repeat the process until the entire installation is complete for a perfect finish.
Watch the video for detailed instructions and tips to achieve professional results using the CLICK System.
Installing Horizontal Corner Using Y-Angle with Universal System
Installing Horizontal Corner Using Y-Angle with Universal System
1. Trim the Profile: Cut the universal profile at a 45-degree angle using a compound miter saw for a flawless fit.
2. Place the Angle: After installing the furring strips, position the angle against the corner for proper alignment. Important Note: Ensure that the angle is loose and not fastened to the wall during the process.
3. Final Installation: Slide the 45-degree end of the profile into the groove of the angle on both sides and proceed with the installation of the entire wall.
Follow along for expert tips on perfecting your corner installations using the Universal System.
Installing Horizontal Corner Using Y-Angle with CLICK System
Installing Horizontal Corner Using Y-Angle with CLICK System
1. Trim the Click Profile: Learn how to trim the profile at a 45-degree angle using a compound miter saw for a seamless fit.
2. Place the Angle: After installing the rails, place the angle against the corner, ensuring a perfect alignment. Important Note: Make sure the angle remains loose and is not fastened to the wall during installation.
3. Final Installation: Slide the trimmed profile into the groove of the angle on both sides and proceed with the wall installation.
Watch the full video for detailed instructions and helpful tips to complete your project using the CLICK System.
How to Install Ceiling Cladding or In-Between Walls
How to Install Ceiling Cladding or In-Between Walls
1. Trim the L-Angle: Cut the L-angle at a 45-degree angle using a compound miter saw for a precise fit.
2. Create a Frame: Use the cut angles to form a frame around the ceiling or wall. Important Note: For easier installation, you can use our aluminum furring strips. Ensure that the angles are secured on top of the furring strip.
3. Shave the Tongue: Shave the tongue of the first and last profiles for better installation.
4. Snap and Secure: Begin by snapping in the first profile and securing it with flat head self-drilling screws. Continue sliding and securing the profiles until the installation is complete.
This method ensures a seamless and professional-looking installation. Watch the video for detailed instructions and tips!
How to Properly Prepare Tape Before Installation
How to Properly Prepare Tape Before Installation
Before Install: Always remember to cut off part of the tape to ensure proper alignment and secure installation. Watch this video for detailed instructions on how to prepare your materials before installation using GTO Aluminum’s products.
How to Install When Staggering CLICK and Universal Profiles
How to Install When Staggering CLICK and Universal Profiles
Understand the process of staggering CLICK and Universal profiles. Ensure the profiles align properly to create a flawless and visually appealing finish.
Watch the full video for step-by-step instructions on how to successfully install GTO Aluminum’s CLICK and Universal Profiles when staggering.
How to Install a Corner Using External Angle (30/30)
How to Install a Corner Using External Angle (30/30)
1: Pre-Install the Rails and Attach All Click Profiles: Begin by pre-installing the rails on which the profiles will be mounted. Make sure all click profiles are attached firmly.
2: Ensure All “Click Profiles” Overlap When Connecting at the Corner: Align the click profiles so that they overlap correctly at the corner. This ensures a seamless connection and a stronger structure.
3: Apply Silicone to the Inner Side of the 30/30 Angle: To ensure a waterproof seal and additional stability, apply silicone on the inner side of the angle before installation.
4: Attach the Angle to the Corner and Secure it with Tape: Place the angle on the corner and secure it temporarily with tape to hold it in position.
Wait 24 Hours Before Removing the Tape: Allow the installation to set by waiting 24 hours before removing the tape, ensuring that the silicone cures properly and the structure stabilizes.
How to Install Click 45 Degree with L Bracket
How to Install Click 45 Degree with L Bracket
Discover the perfect way to install a click 45-degree angle using an L bracket in this comprehensive tutorial. Ideal for DIY enthusiasts and professionals alike, this video will guide you through the necessary steps and techniques to ensure a secure and precise installation. Watch now to enhance your home improvement skills and achieve professional results!
Rail has bent teeth.
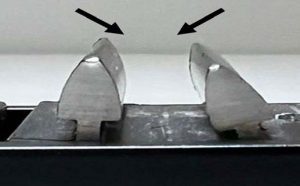 SOLUTION: When drilling screws directly in between the teeth of the rails, bending may occur. If so, lightly unscrew until the teeth are straightened.
Rail has curved/crooked profile
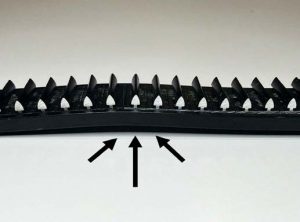 SOLUTION: If the Rail arrives and appears to be slightly crooked or curved, (Rail is a flexible material) simply drill into wall and the profile will straighten naturally.
Vertical installation of Click profiles sliding down from Rail
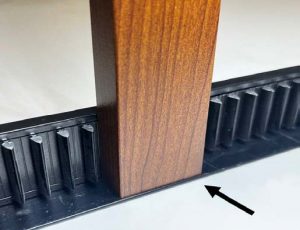 SOLUTION: If in the scenario one is installing the Click profiles vertically, when finishing the base/bottom, the profiles must either be directly touching the floor/baseboard or must be fastened with our Angle 30/30 profile in order to avoid any type of sliding.
Click profile is blocked by screw when attempting to snap into rail
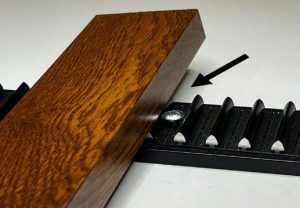 SOLUTION: If in the situation one is attempting to click into place a profile to the teeth of the Rail and it is blocked by a screw, remove the screw, and refasten it into place one tooth to the right before attempting click the profile in again. (Recommended always to calculate beforehand where the screws should be fastened before attempting the click process. )
Fastening Click profiles around electrical wall outlets
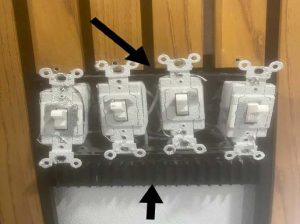 SOLUTION: Angles must be fastened directly to the top and bottom (if Vertical) or directly to the left and right (if Horizontal) on the edge of the outlet box. Additional rails must be placed within 3 inches above or below (if Vertical), right or left (if Horizontal) of the outlet box.
Creating finished corners without the need of an Angle with Click profiles Profiles
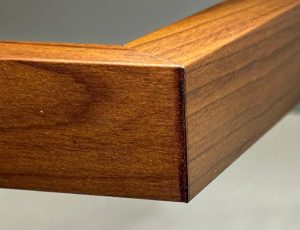 SOLUTION: In order to cut a 45-degree angle cut in the Click profile one must use a combination square, and an electric miter saw. Set your combination square on the 45-degree mark and draw the cut line. Then adjust the miter saw to 45 degrees, align it to the cut line, and gently guide the saw into and through the profile. Fasten onto the wall with the 45-degree edges touching each other.
Click profiles wall exceeds the length of the profile. Two profile ends need to be connected to each other.
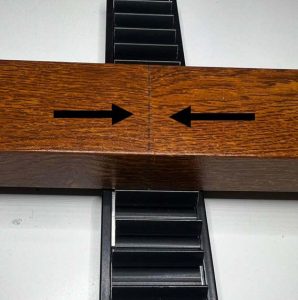 SOLUTION: When attaching two profile ends to each other, in order to extend the length, one must fasten the two ends between one rail. To fasten both ends to one rail, one must calculate the exact middle point of the rail in which both profiles will meet and directly touch each other. Make sure to calculate before installing the rail to the wall. Once measured and installed, click both profiles in the middle of the top and bottom edge of the fastened rail.
Back Wall Black / affordable “U” profile alternative
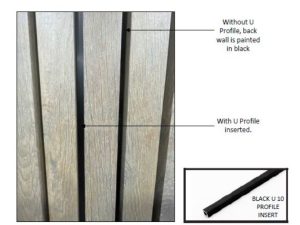 SOLUTION: Painting the back wall black instead of using U profiles is suggested when dealing with larger/exterior walls. Visually, the difference is minimal, and this adjustment could significantly reduce costs without compromising aesthetics.
DOWNLOADS
Click System Manual
Universal System Manual
Structural Manual


